Making a Wildlife Garden Pond
Benefits - Costs - Safety - Design - Construction - Maintenance - Plants

A well-established garden wildlife pond in early springtime. The margins of this pond are managed as a miniature wildflower meadow.
In the past, ponds played a variety of important roles in our lives. On farms they were essential sources of water for animals, but as it became easier to provide drinking water from mains supplies, many farm ponds were drained and the land used for other purposes. Ponds on village greens were centres for local gatherings. They also provided reservoirs of water to fight fires, particularly when many of the local dwellings had thatched roofs.
During the past century nearly 70 per cent of these ponds have disappeared, either having been filled in or simply allowed to become choked with weeds and scrub. (Unless properly managed, even quite a large pond will simply fill up with silt and become a marshy scrubland within 100 years.) By far the biggest casualties of these losses were the wildlife species that depended on them for their survival.
Why build a pond?
Increasingly, garden water features provide havens for insects, birds and other animals in much the same way that roadside verges are now vitally important habitats for the plants and creatures that once thrived in our meadows and other unimproved grassland areas before so many of them were destroyed.
A garden pond doesn't have to be fancy, and it certainly doesn't need to be populated with alien fish species in order to create interest. Even if you do nothing but add water, a pond left to Mother Nature (who is said to abhor a vacuum) will soon attract a whole range of fascinating creatures which will keep you spellbound for hours. Far better though is to manage the environment for the wildlife and increase the opportunities for it to thrive.
What would a pond cost and how long would it take?
The answer depends on size, of course, but in cash terms a garden pond can cost surprisingly little, providing that you do the excavation work yourself. A teardrop-shaped PVC-lined pond 4 metres x 3 metres x 0.5 metres deep can be constructed for a materials cost - liner and underlay are all you need - of less than £100. The creation of such a pond is illustrated below, and we excavated, lined, filled it with water and inserted marginal plants in about ten hours. (Hiring a mechanical digger would have speeded the process but at significantly increased cost.)
What size should the liner be?
PVC liners are a ideal for small garden ponds, and a thickness of 0.75mm is pretty standard; don't settle for less. The liner size is very easy to calculate. Its width should be the width of the pond plus twice the depth. Similarly, its length should be the length of the pond plus twice the depth. So our 4m x 3m x 0.5m pond requires a liner 5 x 4 metres. Most garden centres stock pond liners in standard widths and will cut whatever length you require. (Liners cut from rolls more than about 3 metres wide usually contain factory-made joints, but don't worry as these joints are actually stronger than the rest of the liner.)
The liner will need an underlay, which needs to be the same size as the liner itself, of course. If there are no sharp stones and no risk of damage by tree roots emerging on the bed of your poind, then a layer of sand may suffice; otherwise strong fabric underlay is essential. If you have nothing suitable, underlay can be purchased at the same time as your pond liner.
Making a plastic-lined pond
First dig a hole... but only if you need to! If you are lucky enough to have a natural pond in your garden all you need to do is to manage the site so that you maximise its capacity to attract wildlife and increase biodiversity in your garden.
Having lived with and managed both natural and man-made ponds, I do not believe that one type has any great advantage over the other. What is clear, however, is that whether you live in the countryside or in a town a water feature in your garden is of huge benefit to local wildlife, providing a haven for many more species.
Safety First
Before you start work, consider whether your pond might constitute a hazard, particularly if you have young children living with you or who visit regularly. A pond will provide a big learning boost for young people, but safety must come first. Very young children are just as likely to get fun and enjoyment out of watching birds visiting a bird bath or a very small pool made from an old barrel or a discarded butler sink set into the ground.
Choosing the Site
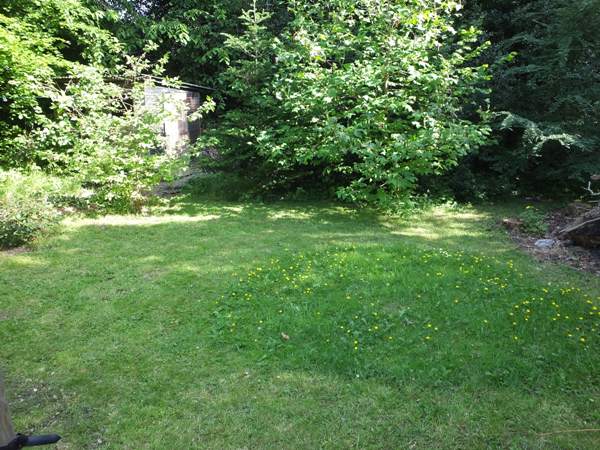
An ideal semi-shaded site for a garden wildlife pond, with a small adjacent area to be managed as a wildflower meadow.
The only real option for siting a pond in our current garden (top picture) was the middle of a lawned area that also coincided with the centre of the garden overall. It is quite near to the house, and so we can view it at very close quarters from our office and the adjacent conservatory. The advantage of this is that we don't miss much when we are around, but the disadvantage is that our movements often disturb visiting creatures and cause them to flee or fly away. A more remote site might be more beneficial to the wildlife, and it is always possible to strategically position a seat somewhere discreet from where you can enjoy the view and watch the action.
The next consideration is whether the site is in full sunlight or shaded. Either option is fine but they will attract different wildlife species. New ponds, whether in the light or shade, will initially suffer from influxes of blanket weed or other algae. Having the right sorts of plants in and around the pond will solve this problem and keep the water crystal clear, making it easy to see the many creatures that scurry along the pond bed.
A well planted pond in full sun will attract lots of butterflies, dragonflies and damselflies; the sunlight will also encourage the plants to grow more quickly. A shady pond will favour frogs, toads and newts; and, if the surrounding land is also damp, wildflowers such as Ragged Robin, Marsh Marigold and Marsh Cinquefoil will thrive there. Ponds in full sun may require more frequent topping up with water in really dry spells, although even shady ponds are not immune to the problem of water evaporation. It is therefore wise to ensure that your pond is within reasonable distance of a water source. Ideally, install a hose pipe fed from a water butt that collects rainwater from your roof: this way you will avoid 'polluting' your pond with the chemicals that are present in mains water.
Planning the pond
A simple plan like the one below shows not just the shape of the pond but also gives an idea of where various plants can be positioned. Depending on where sunnier, shadier or damper parts of the site are situated, the plants can be sited to suit their needs. For instance, if there is a higher, drier bank to one side it would not be the ideal place to plant Ragged Robin which likes damp soil. Similarly, tall plants such as Flag Iris and Yellow Loosestrife are best planted at the 'back' of the pond and lower-growing plants at the front or wherever you intend to sit to observe your pond.
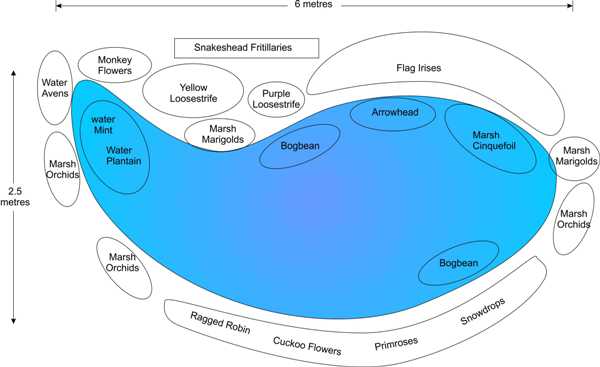
A simple plan showing the overall shape and size of the pond and where plants will be sited.
A cross-section plan is useful for defining where the shallower water should be. The 'low point', where excess rainwater escapes, will quickly become a boggy area that will favour plants such as Marsh Marigold, Water Mint, Water Avens and Monkey Flowers.
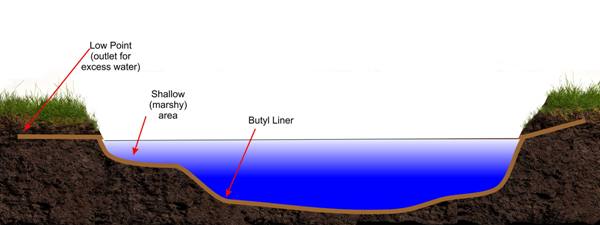
A cross-section plan showing the varying depths of the pond informs the digging part of the project. Depth variation allows for different habitats to be created in and around the pond. The more varied the habitats the more diverse the wildlife will be.
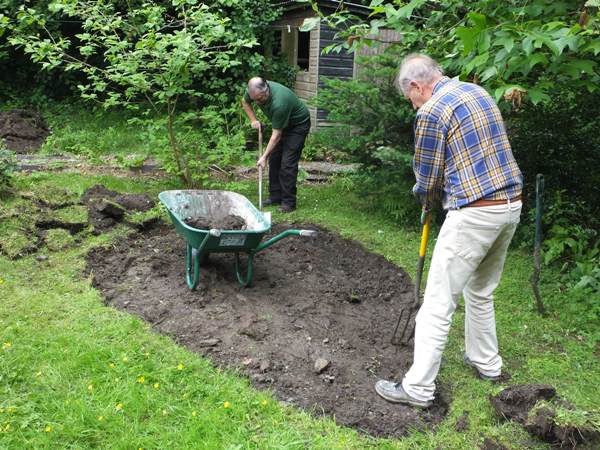
Construction
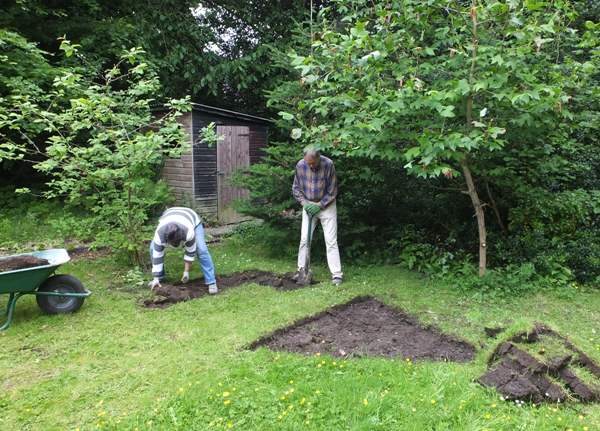
In the example below the pond was small enough to be dug out and the construction finished within two days. A larger project may require a mechanical digger to be brought in in order to dig the hole.
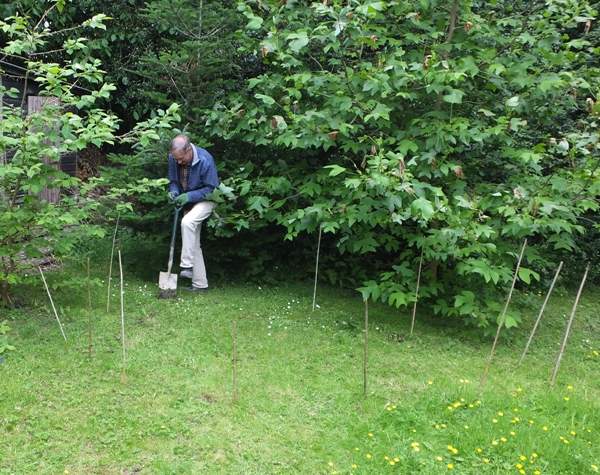
After marking out the perimeter of the pond with canes, the work on removing the surface turves begins.
The turves can be put aside and used to build up the edge of the pond, where necessary, before it is filled with water. If the weather is dry they will need to be kept 'watered' so that they remain in good condition.
Removing and setting aside the turves for later use.
Digging the hole begins once the turves have been removed and set aside.
Non-mechanical diggers at work!
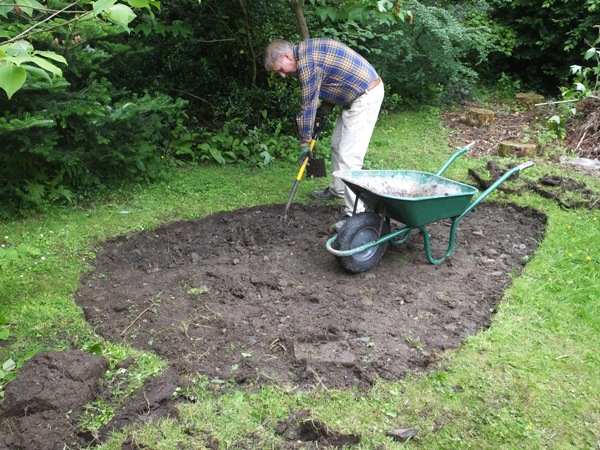
Topsoil is expensive and often difficult to come by, so it's a good idea to have a plan for what to do with the valuable earth that comes out of the hole. In this case there was a ready-made raised bed which needed topsoil. The garden, which had previously been largely 'ornamental', lost none of its beauty, but it became a wildlife paradise and vegetable-growing-ready in the space of just two days!
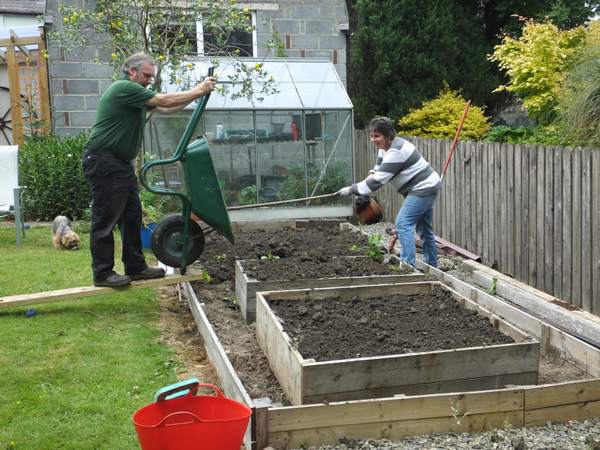
Don't waste the soil; use it to make a raised bed for growing vegetables and flowers.
Even if you have sandy soil it is likely that there will be some sharp stones in the bed or sides of the pond, and they could pierce the pond liner once under pressure from the weight of the water. If the liner suffers even a small puncture the water level will fluctuate widely with rainfall, which would not only spoil the appearance of your pond but could be seriously detrimental to some of the creatures and plants that will come to rely on it.
In the example featured here, a thick old carpet underlay was available, and it made a superb underlay. It is still important to remove any sharp stones or roots protruding from the sides or bottom of the excavation. The underlay does not have to be a single piece. Old towels, curtains or other old household linen would also work, but in multiple layers to achieve a thickness of at least 5mm. (Incidentally, should your liner ever need replacing there is no need to remove the old one; however, everything else in the pond will have to be removed including the plants and animals!)
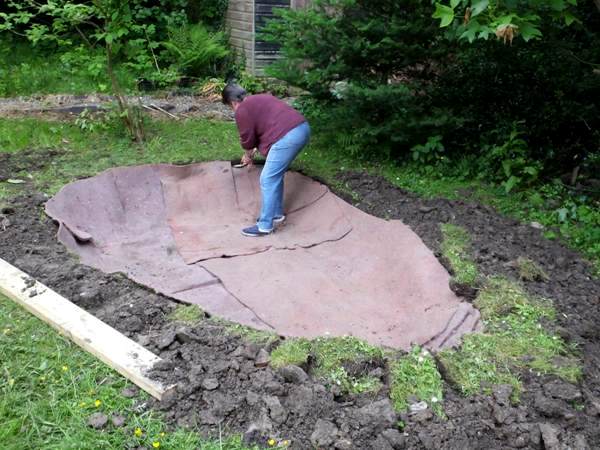
Fitting and trimming the underlay
The liner is fitted on top of the underlay, and the edges are tucked under flaps of turf. Ensure that the edge has no low points; otherwise the water level will settle below that intended.
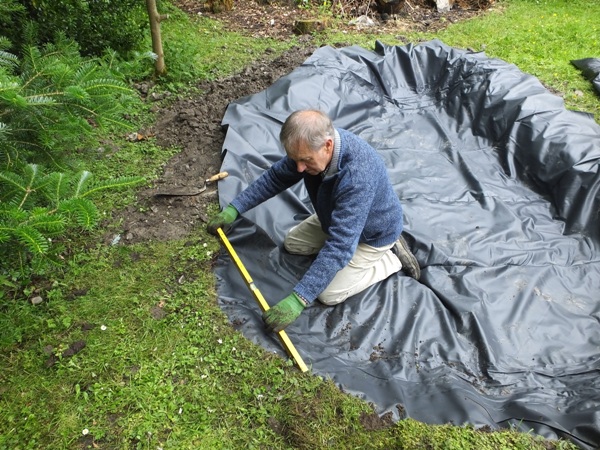
Checking that the perimeter pond edges are level is important.
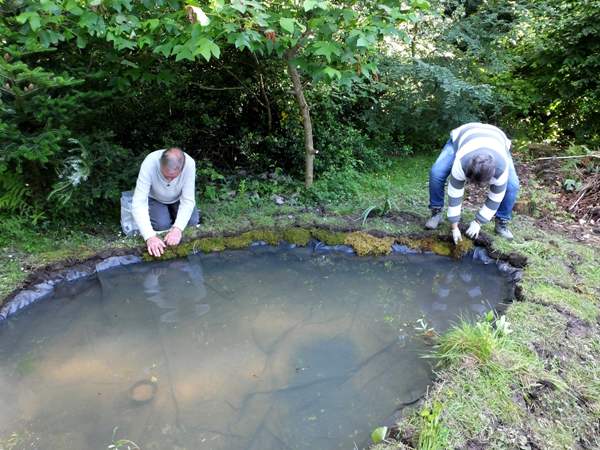
Once the liner is fitted and secured around the edges, it is time to fill the pond with water, to plant some of the marginal flowers, and to build up or grade the banks of the pond using the turves that were removed earlier.
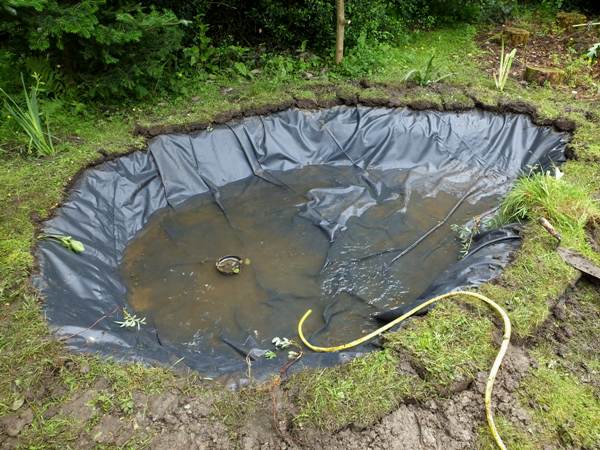
Just add water. Filling a pond of this size can take a couple of hours.
Once filled work can begin on building up the pond margins and planting. The plants that will grow out into the pond are inserted in between the turves used to build the margins, and the others strategically placed to provide as natural-looking a backdrop to the pond as possible.
Once the margins have been levelled the planting can begin.
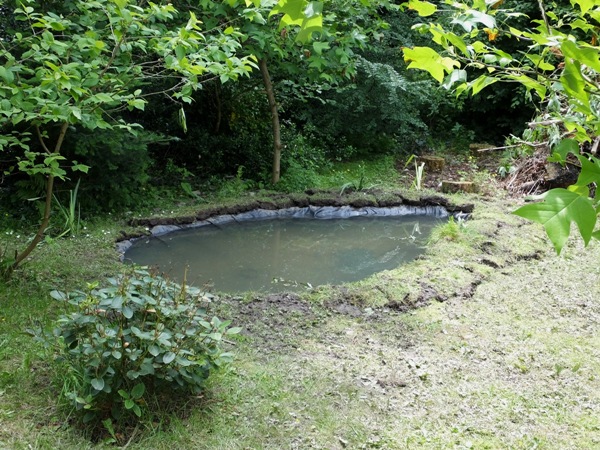
Eventually the grass and moss from the turves at the edge of the pond will grow down into the water creating a completely natural-looking margin. To speed this process, if you are lucky enough to have a good supply of moss in your garden, use some of it to cover the liner between the edge turves and the water surface.
Whatever you do, plants will eventually extend into the margins of your pond, acting as a wick and drawing out some of the water so that during dry spells the level will fall somewhat. This is perfectly normal and not a sign that your liner is punctured; indeed, the water level of all natural lakes varies. Evaporation during hot weather also causes pond levels to fall temporarily. This is another reason why it is worth having a water butt from which you can top up your pond during prolonged dry spells.
Inserting moss around the edge of the pond creates an instant natural-looking margin. The grassy edge will soon grow in with the moss and conceal the liner.
Making the most of a natural garden pond
Some gardens have natural ponds or so-called puddled clay ponds that look very natural. The latter is made by lining the pond with wet clay and then stamping on it (a bit like crushing grapes) to compress the clay until it forms a leak-proof seal. If the pond is large, this process can be very hard work and also time-consuming, but some may think the appearance worth the effort. If the pond is new then the process of planting it up and then managing it will be the same as for a man-made plastic-lined pond.
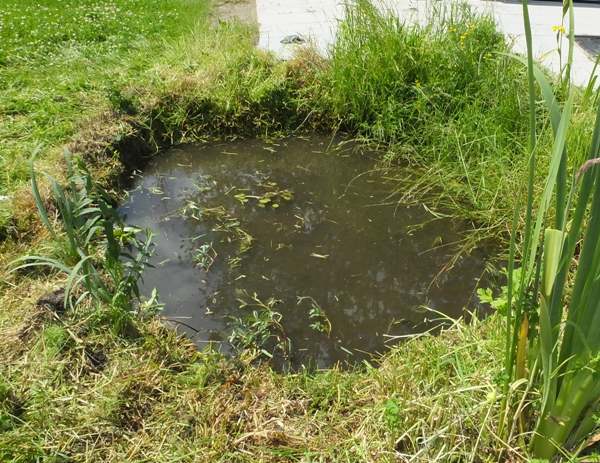
The example below is of a very small clay-lined pond which had been neglected and was suffering as a result of the introduction of the alien plant Canadian Pondweed Elodea canadensis. There was also a thick layer of blanket weed (filamentous algae) on the surface. Both had to be removed before introducing native aquatic plants that would oxygenate the water and encourage more wildlife to visit or take up residence in the pond.
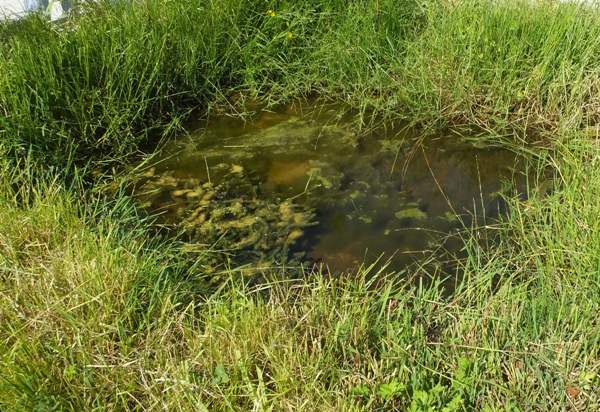
This small pond was full of alien plants and surrounded by rank grasses. Both must be suppressed in order to maximise the pond's wildlife potential.
The margins were also overrun with rank grasses that needed to be cut right down, the mowings being regularly removed in order to impoverish the soil and encourage native wildflowers. The introduction of Yellow Rattle, a plant which parasitises grass roots, will further help achieve conditions favourable to wildflowers; this species is often found in wild orchid-rich habitats.
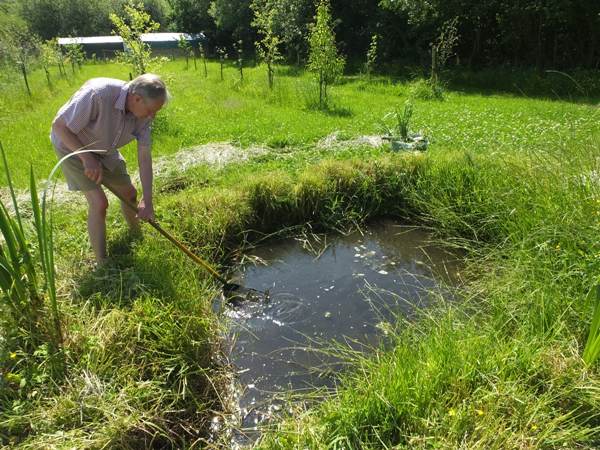
The grass around the pond has been hacked back and the Canadian Pondweed and blanket weed are now being raked out.
Native aquatic plants are introduced to the margins of the pond.
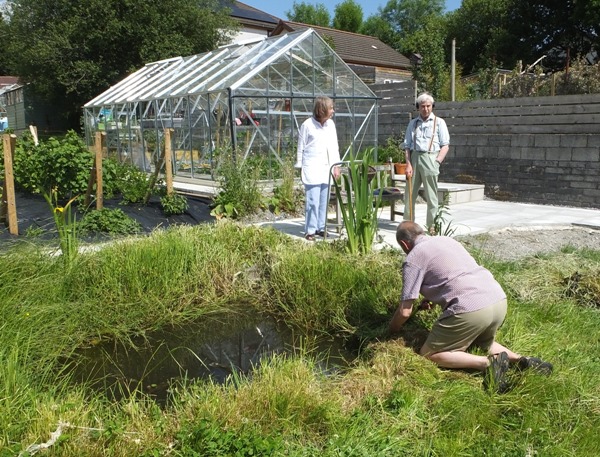
The first phase of the restoration of this small clay-lined pond is complete.
Once cleared and replanted with native plants this small pond will require a period of fairly intense maintenance to ensure that there are no hidden remnants of the alien weed waiting to return and crowd-out the native plants. The margins will also require frequent clearing and cutting in order to reduce the dominance of the rank grasses until Yellow Rattle plants can take over that role.
Managing Garden Ponds
Once established, garden ponds normally require very little maintenance. Should an invasive alien plant arrive, perhaps having been brought in on the legs of a bird or as a result of introducing new plants among which aliens sometimes lurk, then remove every bit of it before it can take hold.
If your garden is surrounded by heavily fertilised farmland, your pond may become muddy-looking and blanket weed may appear if heavy rain washes farm chemicals into the water, causing eutrophication. Usually if you remove as much of the blanket weed as possible the water should soon become clear again.
In the case of the established pond pictured at the top of this page, maintenance generally consists of mowing the margins once a year after the seeds of the wildflowers have been shed - usually at the end of July. In Autumn (October is ideal) trim back the more vigorous plants in the pond so that they do not develop at the expense of others. Root-spreading plants such as Water Mint may need to be dug out in the shallower parts of the pond in order to prevent that area becoming a bog, which is what eventually happens to ponds in the natural world.
The ideal pond has a good covering of native surface plants but also areas of open water. Any plants that have been removed from the pond should be left on the side for at least 24 hours so that creatures that were attached to them and inadvertently removed from the pond have a chance to crawl back into the water. When raking excess plant material from the pond be careful not to damage the liner.
Plants to grow in and around small garden ponds
- Flag Iris - Iris pseudacorus
- Bogbean - Menyanthes trifoliata
- Fringed Waterlily - Nymphoides peltata
- Lady's Smock - Cardamine pratensis
- Marsh Marigold - Caltha palustris
- Purple Loosestrife - Lythrum salicaria
- Yellow Loosetrife - Lysimachia vulgaris
- Water Avens - Geum rivale
- Monkey Flower - Mimulus guttatus
- Marsh cinquefoil - Comarum palustre