![]()
Best Fishing Knots and how to tie them
Knots are the weakest part of a fishing outfit; don't let yours be weaker than they need be... but if, like us, you prefer to keep things really simple then here are all the knots you need and how to tie them.
General points
Wet all knots before slowly pulling them tight. This lubricates the surface and reduces friction, which may otherwise heat up and weaken the nylon. To do this, spit on the knot rather than putting it in your mouth; that way you do not transfer bacteria from the river of lake to your mouth.
'Double-strength' nylon should be used only when necessary, and then only for the very finest section of your leader. Ordinary nylon has greater stretch and shock-absorbing capacity.
Arbour Knot - for joining the backing to the spindle (arbor) of a fly reel
If all goes well, once tied and the backing wound on to your reel, you should hope never see this knot again...
Loop the backing around the reel arbor and tie a double overhand knot at the end of the loose end.
With the loose end tie an overhand knot around the backing line.
Tighten the overhand knot around the backing line while bringing the double overhand knot at the loose end close to the backing line.
Pull on the backing until both knots touch and slide hard against the arbor. Job done!
Water Knot - for joining lengths of nylon together to make up leaders
Easy to tie, even in the dark or when your hands are cold and wet, this knot is one of the strongest and most reliable of all for joining lengths of nylon (or other leader materials), providing the difference in diameter between the two pieces is not more than about 40 per cent. In practice if the breaking strains vary by no more than a factor of two then this knot will work well.

Lay the two lengths of nylon alongside one another with the long end of the finer nylon to your right (but to your left of course if you are left handed).

Wet the overlapping sections so that they cling together, and then form a large loop.

Bring the longer end of the tippet nylon and the short end of the heavier nylon over and through the back of the loop, as in an overhand knot. Do not pull tight, but repeat step three making sure both ends pass through the loop.
Pull on all four ends to close knot. Use thumbnails to push turns close together as you pull on main line and tippet.
Trim off the unwanted ends.
Note
If the two lengths of nylon are of significantly different thickness (more than about 40 percent different in breaking strain), repeat step three to make a three-turn water knot. It is bulkier but stronger than a two-turn water knot, especially when dissimilar strength nylon sections are being joined.
Creating Droppers
If using one of the short ends as a dropper, always trim off the lighter nylon and attach the fly to the heavier nylon. Even though it hangs out invitingly, using the thinner end as a dropper is unwise: the knot opens up and will break easily if a fish pulls on the dropper hook. (Even if the two pieces are of equal strength, always use as the dropper the end that hangs down towards the tippet of the leader.)
Blood Knot - for tying flies on to the fine end (known as the tippet, or point) of the leader
Referred to as the 'Tucked Half-blood Knot' or simply 'Blood Knot' this is a very simple and effective way of attaching a fly to a leader. Alternatives, such as the 'Eugene Bend' and the 'Turle Knot', have advantages in certain circumstances, but if you want to learn just one knot for joining flies to a leader this, we recommend, should be it.
Thread the leader tippet through the eye of the hook, leaving at least four inches (10cm) of spare material to complete the knot.
Wrap the loose end of the tippet around the leader five times.
Bring the loose end of the tippet over to the hook, and insert it through the loop of nylon you have now made in front of the eye of the hook.
Bring the loose end back up and pass it through the new loop you created in step 3.
Pull the knot down slowly, using a thumb nail to bring the turns close behind the eye. Do not pull tight yet...
Wet (or spit on) the knot to lubricate it.
Tighten the knot by pulling on the leader with the hook bend secured on the ring of your scissors. Jiggle to fully tighten the knot.
Now trim off the spare end.
Needle Knot - for joining the butt of a leader to the end of a fly line
Tricky to master at first, this is by far the best leader attachment knot of all. With practice, you can tie one in less than two minutes, and it will last a season or two.
Prepare the leader butt by cutting it at a slant to make a point.
Insert a needle into the end of the fly line and out of the side, as shown. (Rotating the needle to eases its passage through the fly line core.)
Keep the fly line folded back as you withdraw the needle and insert the leader butt, threading 20 cm (8 inches) out of the side of the line.
Wrap four or five turns loosely around the fly line
Fold the end of the leader back to create loop A
Fold the leader a second time to create loop B.
Hold loop B alongside the end of the fly line where the final knot is to be, and now unwind the five turns, covering loop B with each turn.
While preventing the turns from uncoiling, pull on both free ends of the nylon
Finally, push turns closely together, tighten fully and trim off the loose end of leader butt. Some people like to cover the knot with a neat blob of superglue to improve its appearance, but it's not essential and in our experience this knot is just as strong without.
Nail Knot - alternative (simpler to tie) method of joining a leader to a fly line
Much easier than the needle knot, and certainly the best option if you need to change an entire leader while at the waterside, the nail knot can be just as strong and almost as neat as the needle knot. In this series of photographs the fly line is the blue material and the leader/backing material is the red material.
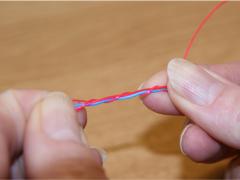
Take the fly line in your left hand and the backing/leader in your right hand. Lay a loop of folded-back leader or backing along the fly line leaving a lengthy tag end. Wind the tag end around the fly line and the backing four or five times, depending on how thick the backing line is - the thicker it is the fewer turns are required. See picture above - the tag end and the end of the fly line are held in my right hand and the loop and flyline are held in my left hand.
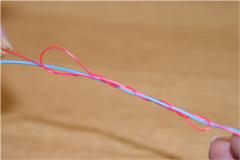
Gripping both ends of the knot firmly, pass the tag end back through the loop which is held in your left hand and then gently pull on both ends of the knot (see above) until the turns in the leader/backing come together in a neat coil around the fly line. This is the trickiest part of the knot - too much pressure from the right hand end of this operation will cause the knot-in-the-making to slide off the end of the fly line. It is a mixture of gently pulling and teasing/sliding the coils together. See picture below.
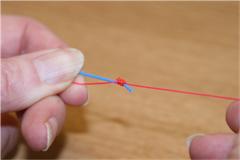
Once the coil of leader/backing is tight around the fly line you can start to exert more pressure by pulling on both ends of the knot to tighten it, but be careful, even at this stage the coil of knot can easily slip off the end of the fly line if it is not tight enough.
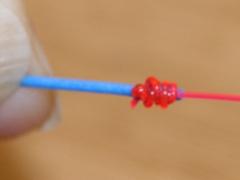
Once the knot is rock solid trim off the tag ends of the fly line and the leader/backing material - see picture above.
Some people like to cover the knot with a neat blob of superglue to improve its appearance, but it's not essential and in our experience this knot is just as strong without.

Excited at the prospect of flyfishing? So are we, and we're pretty sure you would find the Winding River Mystery trilogy of action-packed thrillers gripping reading too. Dead Drift, Dead Cert, and Dead End are Pat O'Reilly's latest river-and-flyfishing based novels, and now they are available in ebook format. Full details on our website here...
Buy each book for just £4.96 on Amazon...
Please Help Us: If you have found this information interesting and useful, please consider helping to keep First Nature online by making a small donation towards the web hosting and internet costs.
Any donations over and above the essential running costs will help support the conservation work of Plantlife, the Rivers Trust and charitable botanic gardens - as do author royalties and publisher proceeds from books by Pat and Sue.